In times of Zero Trust and its principle to assume breach at any time, it is barely unthinkable to use webservices without encrypting the communication channels between endpoints. Especially when using cloud services over public networks! For that reason, SSL and TLS certificates are everywhere nowadays and having a public trusted certificate, which can be validated at a public Certificate Revocation List (CRL), is a mandatory requirement to create any hybrid cloud solution.
For companies, ordering and renewing certificates is a recurring standard task. Certificates have validity of 1 – 3 years and they are not very expensive, so that story is told and over. But what about lab environments and private businesses? Having to pay hundreds of Euros just for a certificate for a lab environment is too expensive for most young professionals and some private projects don’t need the extended trust of a bigger public CA. For the reason to provide certificates to everyone without having to pay much, Let’s Encrypt was founded!
In this article I will explain how everyone can request a certificate from Let’s Encrypt, using the Certbot tool and receive a public trusted signed certificate. Because I’m a Microsoft 365 expert myself, I am using Let’s Encrypt certificates for my Exchange Servers and Exchange Hybrid deployments in my labs all the time and I don’t see any reason to pay for a certificate, if I can request SAN and wildcard certificates myself at any time with almost no effort required.
Index
- How does Let’s Encrypt work?
- Requirements
- Deploy the Linux VM for Certbot
- Installation and configuration of Certbot
- Request SAN certificate using Certbot
- Import the certificate to an Exchange Server
How does Let’s Encrypt work?
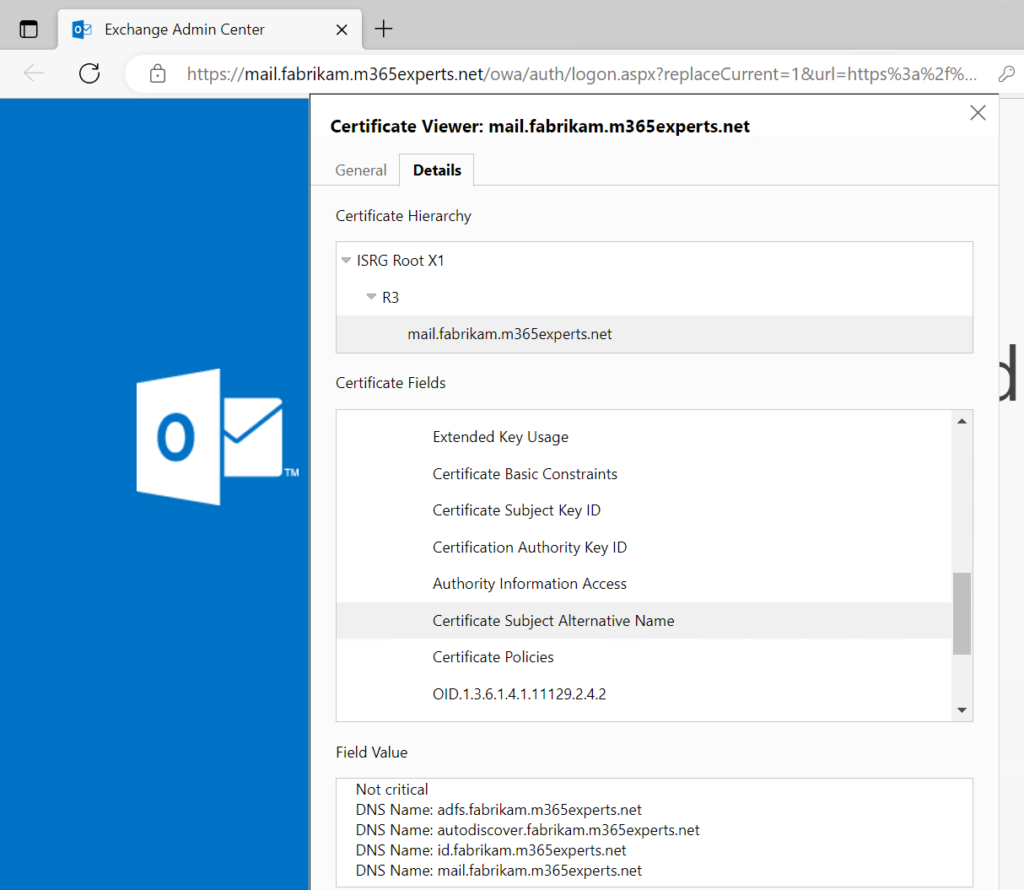
The Let’s Encrypt intermediate CA certificate is signed by “Internet Security Research Group“, which is a CA trusted by any currently supported Windows version. Therefore, visitors and public cloud services can validate signed certificates and trust them. In general, you can create certificates with a Common Name (CN), multiple Subject Alternative Names (SAN) and even wildcard domains. The proof required to get your certificate signed, must be provided by configuring the DNS zone for which certificates shall be issued. For example, if you want to have 5 domain names in your certificate, you need to configure all these 5 DNS records to point to the machine where you start the issuing request. If the Let’s Encrypt servers can use DNS to resolve your DNS records and reach the machine the request comes from, you have prooven to be the admin of the DNS zones and Let’s Encrypt will sign your certificates.
Note: The process is similar for wildcard certificates, but there you need to provide an TXT record in the zone for validation.
In this blog post, I will describe the requirements and steps required to create a SAN certificate commonly used on Exchange Servers. With this setup you can also create a Exchange Hybrid lab environment with Exchange Online. The tool I use to create certificate requests is called Certbot and I will run it on an Azure virtual machine with Linux as operating system, to consume as few credits as possible.
Requirements
There are binaries of Certbot for all commonly used operating systems, but for this lab I have decided to use the latest version of Ubuntu, because it’s widely known, lightweight and easy to setup.
You will need the following resources to perform this how to:
- An Azure subscription with budget remaining
- Management access to the DNS zones you want to create certificates for
- Admin access to your client to install PuTTY and WinSCP
The tool required to request certificates is Certbot and it is available for Linux, macOS, BSD and Windows. In this example, I will deploy a Linux Ubuntu virtual machine in Azure to demonstrate it’s functionality. You will also need management access to the desired DNS zones you want to issue certificates for and port 80 incoming internet access to the machine running Certbot.
Free Azure credits are available for any new registration and Microsoft provides public IP addresses for virtual machines, therefore you don’t need to spend any money for the issuing environment as well. If you have recurring MSDN Enterprise credits, this setup can be used persistent, because the Linux VM does not cost a lot of money when turned off.
This setup surely also works with machines hosted in AWS or Google. If you are hosting your virtual machines at home and you have management access to your router, you can also use any machine on-premises and a NAT rule to validate your certificates.
Deploy the Linux VM for Certbot
I’m using a very basic Standard D2s v3 machine with 2 vCPUs, 8GB RAM and a Standard HDD. This setup is fairly cheap, consuming only 0.097 EUR/hr for the VM and 1.31 EUR per month for the storage. (around March 2023)
Follow these steps to deploy a new resources group with a vNet and the Linux VM:
- Sign in to the Azure portal at https://portal.azure.com with an account that has Owner or Contributor access to a valid subscription.
- Select All services from the left pane and select Virtual machines.
- On the Virtual machines page, select + Create and Azure virtual machine from the top pane.
- Make sure your subscription is selected or select one with budget.
- Select Create new below the Resource group box to create a new resource group.
- Enter “Toolbox” as Name and select OK.
- Enter the following information below Instance details:
- Virtual machine name CertbotVM
- Region <your_desired_region>
- Availability options No infrastructure redundancy required
- Security type Standard
- Image Ubuntu server 2004 LTS – x64 Gen2
- VM architecture x64
- Run with Azure Spot discount <unchecked>
- Size Standard_D2s_v3 – 2 vcpus, 8 GiB memory (€70,79/month)
- Now configure the Administrator account for accessing the VM later:
- Authentication type Password
- Username certbotuser
- Password + Confirm password <any_strong_passphrase>
- At last, configure the incoming port rules for the VM at Inbound port rules:
- Public inbound ports Allow selected ports
- Select inbound ports HTTP (80), SSH (22)
- Select Next : Disks > to continue with the wizard.
- On the Disks page, change the OS disk type to the cheap Standard HDD (locally-redundant storage).
- Leave all other settings as they are and select Next : Networking >.
- You can use the default values for vNet, Subnet and Public IP or change them as you like.
- Leave all other settings on default and select Next : Management >.
- To make sure the machines does not consume all your credits when left turned on by accident, configure the Shutdown time below Auto-Shutdown settings with a convenient time in your Time zone.
- Leave all other settings on default and select Next : Monitoring >.
- On the Monitoring page, at Boot diagnostics below Diagnostics, select Disable. The machine can be replaced at any time and an additional storage account for diagnostic data only consumes credits.
- Leave all other settings on default and select Next : Advanced >.
- Do not make any changes to Advanced and select Next : Tags >.
- Enter any tags that you require for your inventory and select Next : Review + create >.
- Validate all settings and if the Validation passed banner is shown, select Create.
- Wait for your resources being deployed. That will take about a minute or two.
- When the Your deployment is complete page is shown, the VM is available for configuration. Select Go to resource to validate the deployment.
- On the Virtual machine page, select and copy the IP address right from Public IP address and write it down for later use.
Note: You could also create the VM using an SSH key pair for improved security. This is the recommended way to authenticate to persistent machines, because any unintended access to the certificates stored on this VM will be a big threat to the privacy of the encrypted connections. How to generate SSH keys and use them for login into an Azure hosted virtual machine is described in this article.
The Deployment of the virtual machine was successful. Continue with the configuration of Certbot in the next chapter.
Installation and configuration of Certbot
When the machine is deployed and running, you now need to install and configure Certbot. You will connect to the machine using SSH and the username and password configured during deployment.
You can use any SSH client, but for this example I’m going to use the all-time classic terminal client PuTTY and describe the required configuration steps, because I prefer to use saved sessions for quickly connecting to my systems in stock and PuTTY is simply my favorite tool.
Perform the following steps to download and connect to the VM using Putty:
- Download the latest Putty release from the official source at https://www.chiark.greenend.org.uk/~sgtatham/putty/latest.html
- Install the tool and run it from your start menu.
- Enter the public IP address of the virtual machine to Host Name (or IP address).
- Optional: Enter a meaningful name below Saved Sessions and select Save to store the connection for later use.
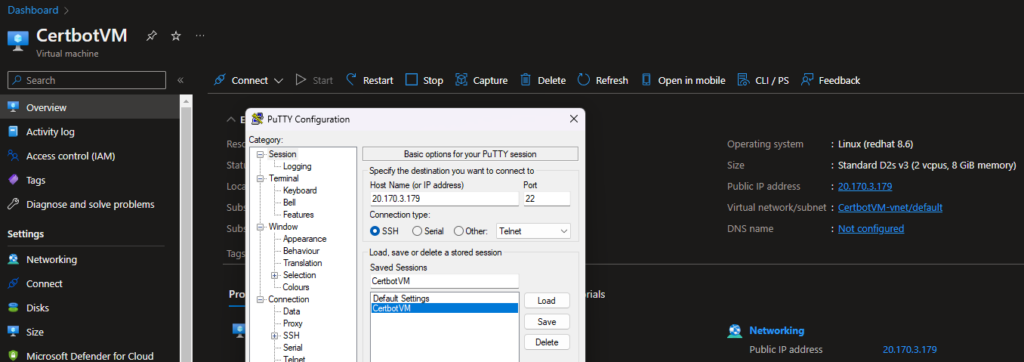
- Select Open to initiate the connection. When a PuTTY Security Alert windows is shown, select Accept to establish a secured connection with the target system.
- On the login as: prompt, enter the username certbotuser and your strong passphrase. Confirm with the Enter key.
The first step in any fresh Linux system should be, to update the repository lists. This is not yet an update of the installed packages. Use the following commando with sudo to update all sources:
sudo apt update
When there are available updates in your sources available, install them with the following command:
sudo apt upgrade
The Certbot documentation recommends to use snapd to download the latest version of Certbot and remove the individual repository managed Certbot versions. Ubuntu should already have the latest version of snapd installed, but run the following command to make sure, snapd is working correctly:
sudo snap install core; sudo snap refresh core
Now remove any possibly present packages of Certbot from the systems repos:
sudo apt-get remove certbot
If the package was not installed, you should only see an message “Package ‘certbot’ is not installed, so not removed“.
In the next step, you are downloading and installing Certbot via snapd:
sudo snap install --classic certbot
For being able to call Certbot without having the use the full path any single time, create a logical link to your systems runtime environment folder by using the following command:
sudo ln -s /snap/bin/certbot /usr/bin/certbot
That’s it: Certbot is installed and ready for you to create certificate requests. But before continuing with the next steps, you should register an ACME account first, to receive expiration and renewal notifications for your certificates via mail. That’s also a first test if Certbot was installed correctly.
Run the following command to register an account:
sudo certbot register
You should be requested to enter an e-mail address for notifications. Then you need to confirm to the Terms of Service of Let’s Encrypt and if you want to subscribe to news from the Electronic Frontier Foundation (EFF), which is not mandatory to issue certificates.
You have successfully installed and run Certbot on your CertbotVM machine.
Request SAN certificate using Certbot
With Certbot completely configured, we can now request a certificate with multiple SAN entries for being used on an lab environment Exchange Server. To use the Exchange Server in an Exchange hybrid deployment with Exchange Online, the certificate used must be a public trusted one and therefore, certificates signed by Let’s Encrypt are the best choice for labs.
The certificate will use the primary DNS address, also called Common Name (CN), of “mail.fabrikam.m365experts.net” and one Subject Alternative Name (SAN) of “autodiscover.fabrikam.m365experts.net”, to make autodiscover work correctly.
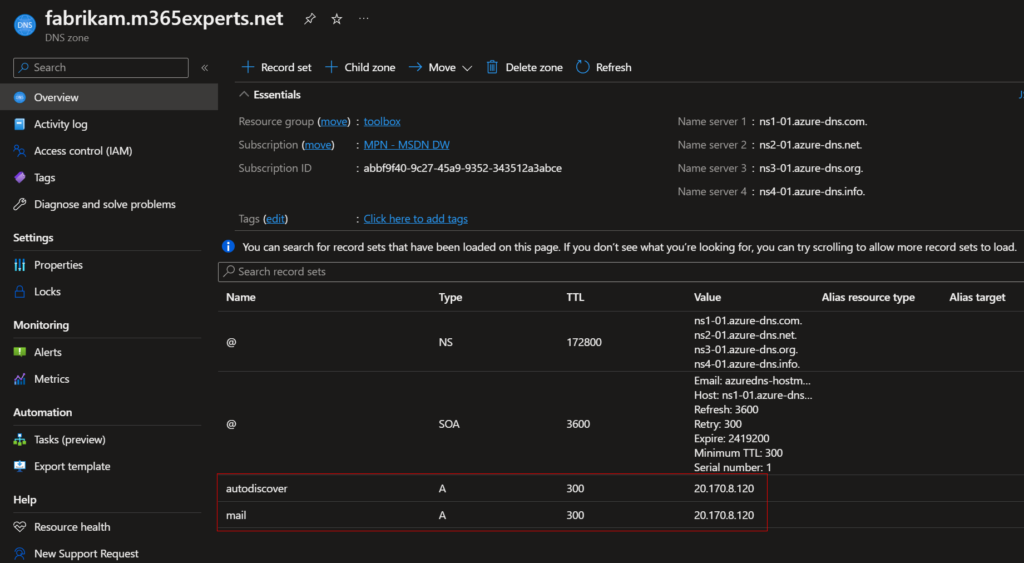
The first step is to configure the DNS zone for “fabrikam.m365experts.net” to create or modify the records in the zone with the names “mail” and “autodiscover” to point to the public IP address of the CertbotVM. You can configure both as A Records or one A Record and let the other point as CNAME to the first one, all that matters is, that Let’s Encrypt can resolve the DNS record an reach the CertbotVM machine.
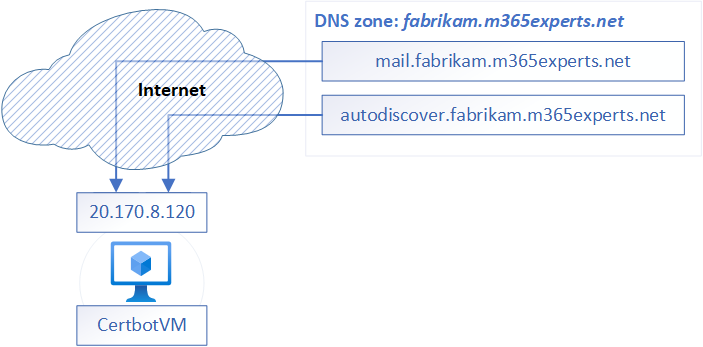
If you are using Azure to manage your DNS zones, use the following steps to create the required zone records for validation:
- Sign in to the Azure portal at https://portal.azure.com with an account that has permissions for the required DNS zone resources.
- Select All services from the left pane and select DNS zones from the Networking area.
- Select your DNS zone to open the configuration page.
- On your DNS zone configuration page, select + Record set to create a new record in the zone.
- In the right side pane, configure the following:
- Name mail
- Type A — Alias record to IPv4 address
- Alias record set No
- TTL 5
- TTL unit Minutes
- IP address <CertbotVM_public_IP_address>
- Select OK to create the record.
- Select + Record set again to create another new record in the same zone.
- In the right side pane, configure the following:
- Name autodiscover
- Type A — Alias record to IPv4 address
- Alias record set No
- TTL 5
- TTL unit Minutes
- IP address <CertbotVM_public_IP_address>
- Select OK to create the record.
The DNS records are now pointing to the public IP address of the CertbotVM and the next step on the Linux machine can be started.
Connect to the CertbotVM via SSH again and create a new certificate request using Certbot. You need to invoke several parameters for the command. In this example, you are using the integrated webserver of Certbot listenting on port 80 and you will add one SAN entry. You will also request an RSA certificate, because ECDSA certificates do not work with Exchange.
- certbot
- calls the Certbot binaries
- certonly — standalone
- starts a listener waiting for connections on port 80
- –key-type rsa
- use RSA as encryption key
- -d mail.fabrikam.m365experts.net,autodiscover.fabrikam.m365experts.net
- use the first entry as CN and all following as SAN, separated by commata
The full command to run on the CertbotVM, connected via SSH:
sudo certbot certonly --standalone -d mail.fabrikam.m365experts.net,autodiscover.fabrikam.m365experts.net
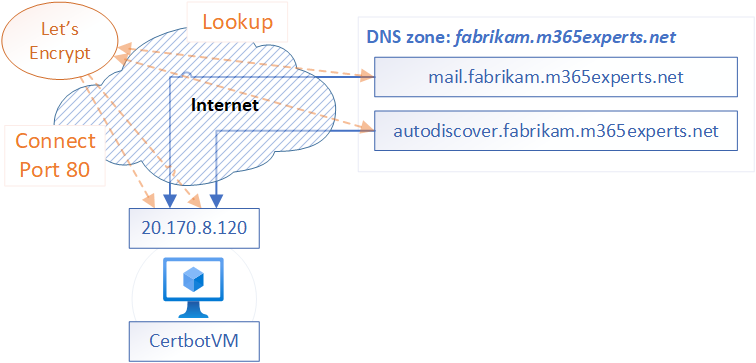
Certbot now created a new certificate and sent a signing request to the Let’s Encrypt servers. These will now resolve the names for the certificate via DNS and connect to the resolved IP addresses on port 80. When the connection reaches the Certbot listener on port 80, the validation is successful on the signing will be finished.
You should see a similar output on your terminal. If anything goes wrong, for example port 80 on your machines is closed or the DNS resolved IP addresses are wrong, you will receive a detailed error message.
Requesting a certificate for mail.fabrikam.m365experts.net and autodiscover.fabrikam.m365experts.net
Successfully received certificate.
Certificate is saved at: /etc/letsencrypt/live/mail.fabrikam.m365experts.net/fullchain.pem
Key is saved at: /etc/letsencrypt/live/mail.fabrikam.m365experts.net/privkey.pem
This certificate expires on 2023-05-29.
These files will be updated when the certificate renews.
Certbot has set up a scheduled task to automatically renew this certificate in the background.
The following pictures provides a high-level overview about the Let’s Encrypt validation process.
You now have four certificate files in your Let’s Encrypt folder on your machine, as you can check by using the following command:
sudo ls -l -R /etc/letsencrypt/archive/
But they are still encoded in PEM, which is not yet ready for being used on an Windows Server machine. You need to create a PFX file including certificate, chain and private key using OpenSSL. The following command will do the following:
- Call OpenSSL to create an PKCS12 encoded PFX file and export it to the filesystem.
- The
-inparameter specifies the cerificate file. - The
-inkey parameter specifies the according private key. - The
-certfileparameter specifies the full chain (optional). - The
-nameparameter sets the friendly name visible in the certificates console in Windows. - The
-outparameter specifies the output path. The~symbol represents the home directory.
Run the following command on your CertbotVM machine and enter an export password to protect the PFX file:
sudo openssl pkcs12 -export -in /etc/letsencrypt/archive/mail.fabrikam.m365experts.net/cert1.pem -inkey /etc/letsencrypt/archive/mail.fabrikam.m365experts.net/privkey1.pem -certfile /etc/letsencrypt/archive/mail.fabrikam.m365experts.net/fullchain1.pem -name "Let's Encrypt Lab Certificate 03/2023" -out ~/mail.fabrikam.m365experts.net.p12
When the conversion has successfully finished, you can find the certificate in your home folder. But the certificate is still owned by root and protected from being accessed with elevated privileges or using sudo. For being able to download the certificate in the next step, you need to take ownership of the file by using the following command:
sudo chown certbotuser:certbotuser ~/mail.fabrikam.m365experts.net.p12
Now you can connect using an SCP client, such as WinSCP and download the certificate to your file system. Perform the following steps to download you certificate using WinSCP:
- Go to the official WinSCP download page and download the latest version of WinSCP.
- Install the WinSCP client to your system and start it from the start menu.
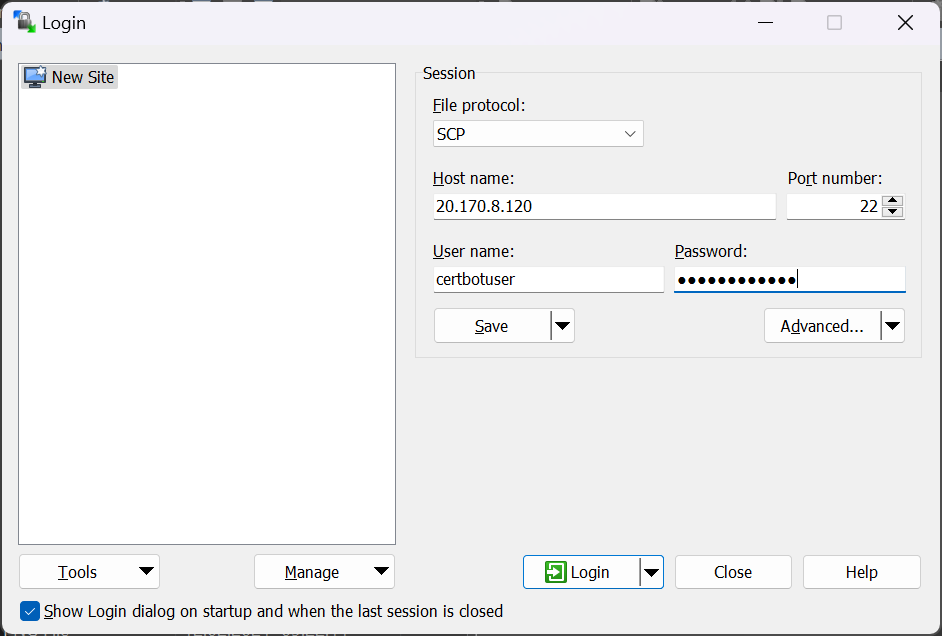
- When the Login window is shown, first switch File protocol from SFTP to SCP.
- Below Host name, enter the public IP address of the CertbotVM and leave the port on 22.
- Enter the User name certboituser and your strong password to Password.
- Select Login to initiate the connection.
- When a Warning window is shown, select Yes to trust the certificate of the machine.
Just like in the old days, you can now see your file system on the left and the home folder of your user on CertbotVM on the right. Simply drag & drop the certificate file to your file system on the left or directly to your Desktop to download it to your client. You need to confirm the download with ok.
Import the certificate to an Exchange Server
The certificate is now ready for being copied to an Exchange Server and can be used like any other certificate issued by a trusted CA. Just import it to your local machines certificate store, bind it using the Exchange Management Shell and test in your browser.
Note: Íf you cannot see the certificate using the Get-ExchangeCertificate cmdlet, you have possibly created it using ECDSA instead of RSA. The default configuration of Certbot was recently changed to use ECDA instead of RSA and that’s why you need to whether change your Certbot configuration or use the “–key-type rsa” parameter to create the certificate correctly for being used with Exchange Server.
Thanks for reading this post! Feel free to leave me a comment or send me a message with feedback or your personal experiences using Let’s Encrypt and Certbot! 🙂